Office Location: 1817 S Main Street, Suite 10 SLC, UT 84115 | Phone 801 . 859 . 4142
Align Integration & Movement
  • Home
  • Work with Me
    • Request an Appointment
    • Rates & Insurance
    • Orthopedic & Pelvic Health Physical Therapy
    • Visceral Manipulation
    • Biofield Tuning®
    • Restore Room: Enhance your healing with Whole Body Vibration & The Vitalizer Chi Machine
    • Microcurrent Point Stimulation Therapy
    • NeuroKinetic Therapy™
    • Nutritious Movement™
    • Workshops
    • Testimonials
    • Resources
  • Blog
  • About Me
    • About Me
    • My Philosophy
  • Store
  • Podcast

Hip Mobility

6/19/2015

3 Comments

 
Improve Hip Mobility with this kneeling lunge stretch
Kneeling Lunge
The hip is simple in it's joint configuration, but very complex in its function.  Like the shoulder, it is a ball and socket joint.  That means that the thigh bone has a spherical head (femoral head) that fits into a cup-like socket (acetabulum) of the pelvis.  This type of joint offers high freedom of motion to allow us to get down into a squat, high kick, dance, karate, etc.  Compared to the shoulder, the hip has a little less motion in order to provide stability, and the femoral head can sit deeper in the socket of the acetabulum in order to prevent dislocation.
Because the hip is ball and socket, the joint is multi-axial, meaning it can move in many many planes of motion. When the foot is not touching ground (open chain) these actions are:
  • Abduction- moving the thigh away from midline
  • Adduction- moving the thigh toward the midline
  • Flexion- moving the thigh toward the chest
  • Extension- moving the thigh toward the back
  • Internal Rotation/External rotation- rotation about the femoral axis
  • Circumduction- moving the joint in a full circle

As I mentioned above, the joint is simple, but the function is complex because the hip joint, like any other joint in the body, does not work/move in isolation.  Lack of hip range of motion can effect the health of the shoulders, spine, pelvis, knees and feet.  Improving hip joint motion is one of the key steps to ensure proper mechanics of the extremities and the spine.  How are your hips?  Try these moves for better movement.
Susan McLaughlin is a physical therapist who specializes in the management of pelvic floor and orthopedic dysfunctions. She is the owner of ALIGN integration|movement in Salt Lake City, UT.  Helpful tips and other self care strategies can be found at www.alignforhealth.com.

3 Comments

Breathing and Core Stability

2/16/2015

7 Comments

 
Core stability
I just did a search on the internet for the best exercises for core stability.
Here are the top exercises that came up in the search:
  • Modified plank on knees
  • Plank
  • Side plank
  • Bridges
  • Bird-dog on hands and knees
  • Crunches
  • Obliques crunches
  • V sits
  • Plank with an exercise ball
  • Dying Bug
These exercises are great for building the global muscles of the core: abs and back muscles, but what about the intrinsic muscles of the core? In my practice, many people have come to me who have already been doing their "core exercises" and yet they still suffer from back pain, SI dysfunction and pelvic floor disorders, etc.  The key to true core stability is to develop motor control, timing and coordination of the intrinsic muscles first, and then develop the abs, obliques and back muscles once the inner stabilization system is firing and wiring together.

Intrinsic Core Muscles

Breathing and Core Stability
Burrell Education has incredible courses. Check them out!

Diaphragmatic breathing is a great way to reconnect the inner core muscles

The Rhythm of the Respiratory Cycle:

  • During inhalation, the diaphragm contracts while the pelvic floor and the deep abdominal muscles relax.
  • During exhalation, the diaphragm relaxes while the pelvic floor and deep abdominal muscles contract.

Establishing Core Stability Through Diaphragmatic Breathing

Susan McLaughlin is a physical therapist who specializes in the management of pelvic floor and orthopedic dysfunctions. She is the owner of ALIGN integration|movement in Salt Lake City, UT.  Helpful tips and other self care strategies can be found at www.alignforhealth.com.
7 Comments

Self Care for Hip, Groin, and Back Pain

10/1/2014

25 Comments


Self Care Steps:

Picture
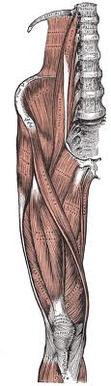
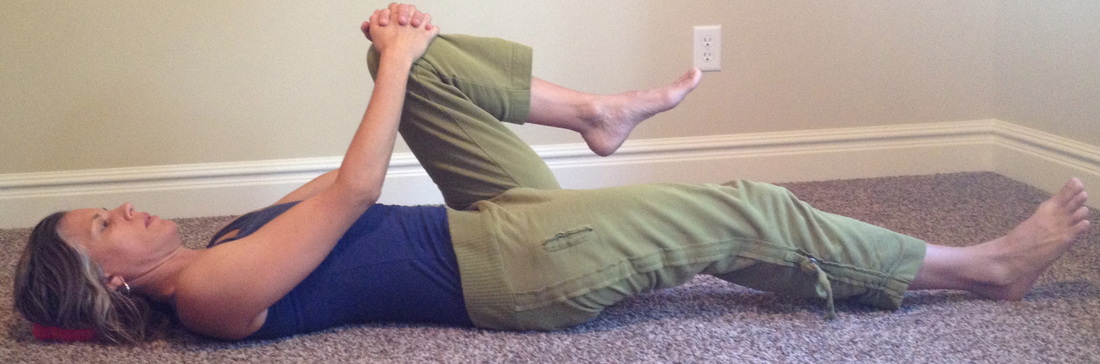
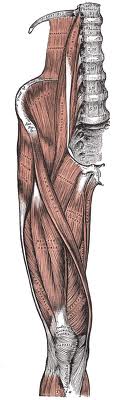
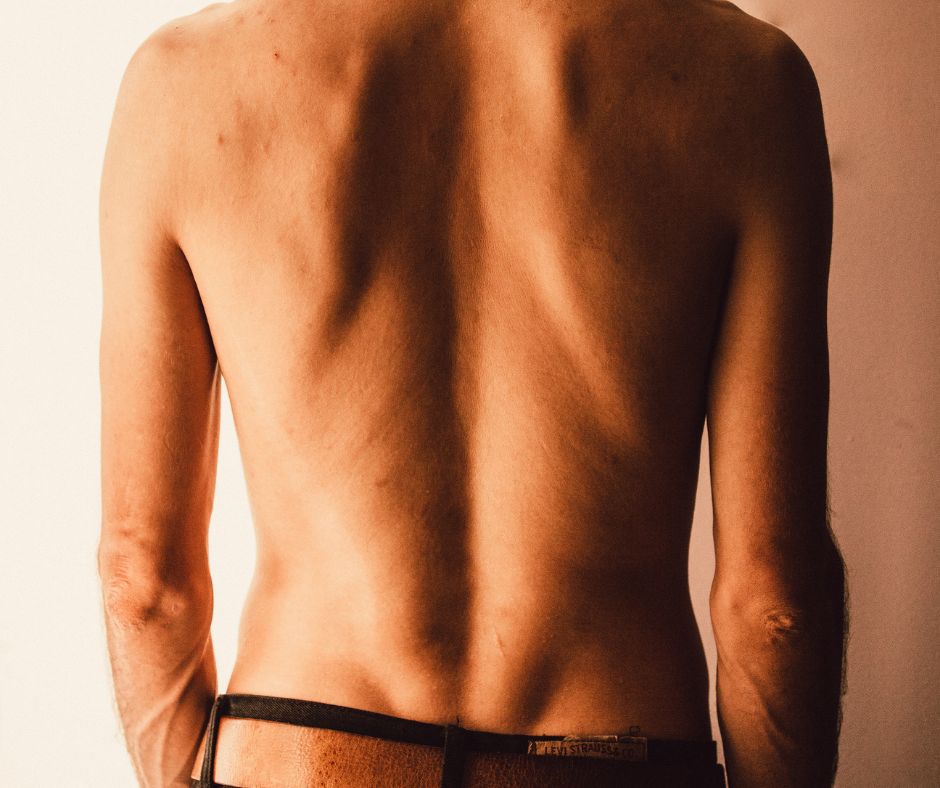
This blog is for those of you who have hip pain, groin pain, hip impingement, sciatica, SI joint pain, or low back pain. And if you don't have any of these, then you are lucky and prevention is the best medicine!
Hip mobility is paramount for a healthy body and spine. During an evaluation I like to observe a static standing assessment, a functional movement assessment, and then perform a passive mobility assessment.  
People with back/hip/groin pain often have a postural position of "butt gripping" (read a great article about it here Diane Lee).  In this position, the pelvis is thrust forward and the deep hip rotators are contracted. When these muscles are overactive, they push the head of the femur into the front part (anterior) of the hip capsule which can interfere with hip motion: hip flexion (bringing the knee toward the chest) and internal rotation (turning the thigh inward).
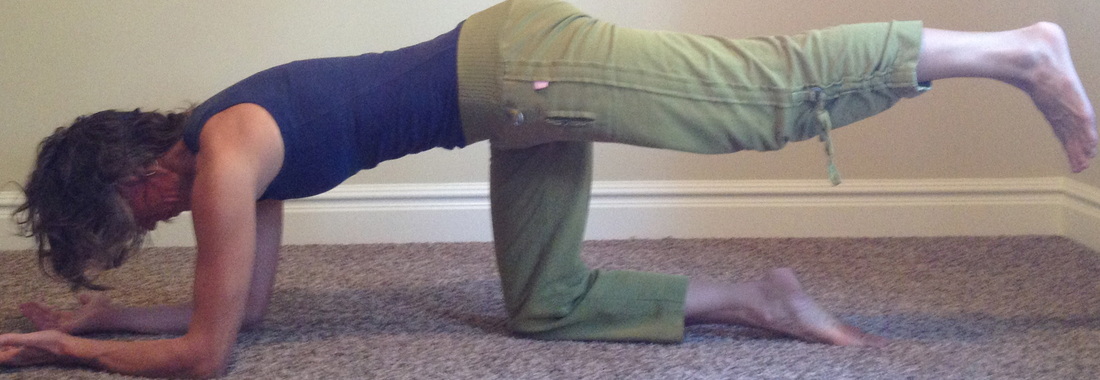
On the functional exam I will see an inability to go into a deep squat, or the hips will shift to the opposite side during the squat.  On the passive motion test there will be a limitation in hip flexion, and they may express pain with a combination of movements: hip flexion, adduction and internal rotation.
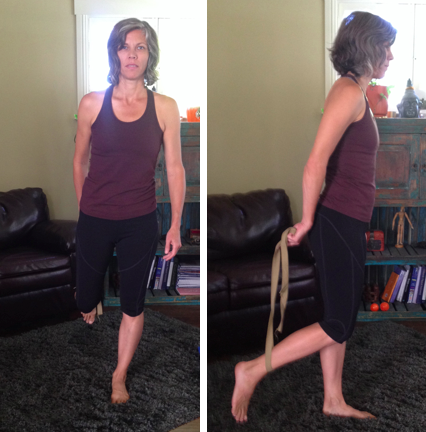
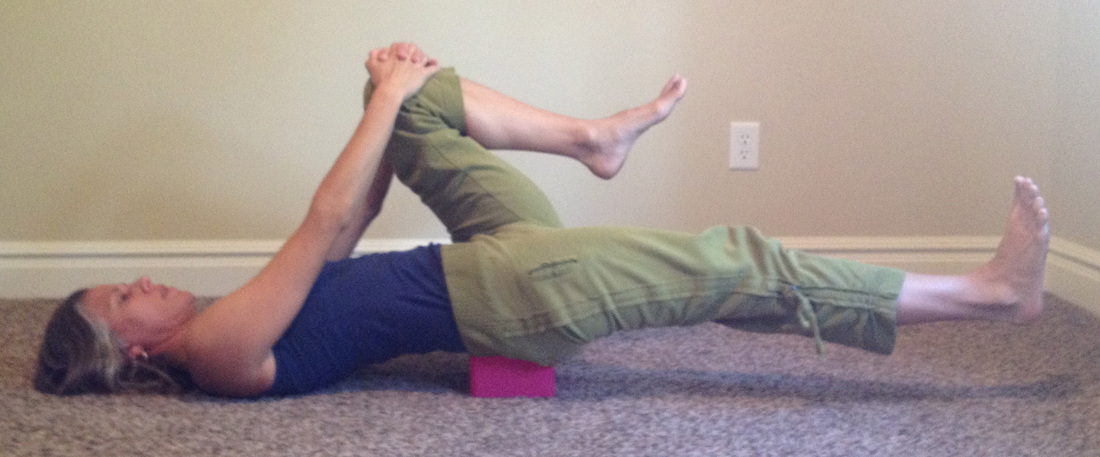
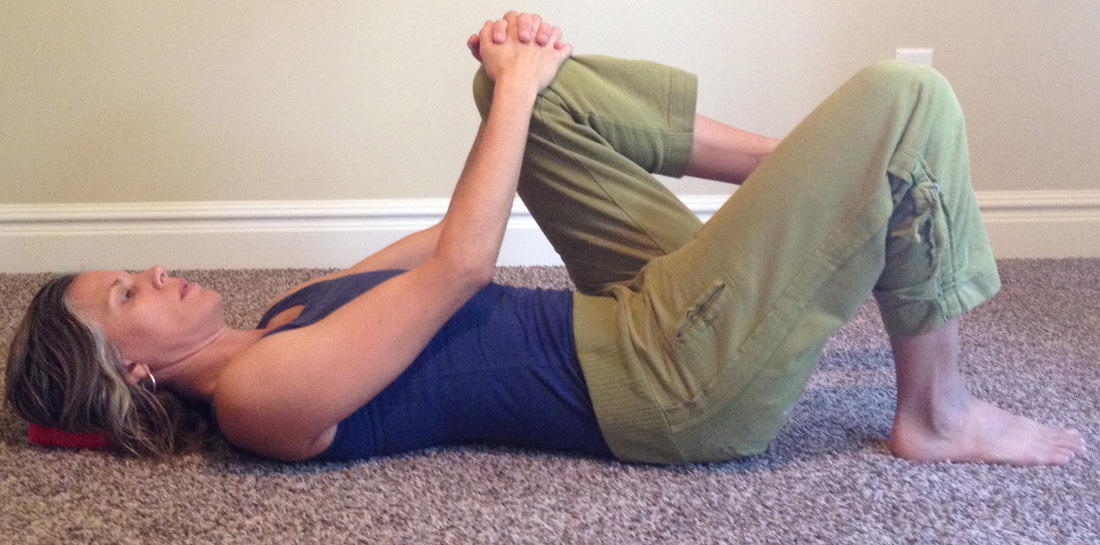
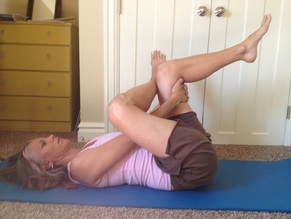
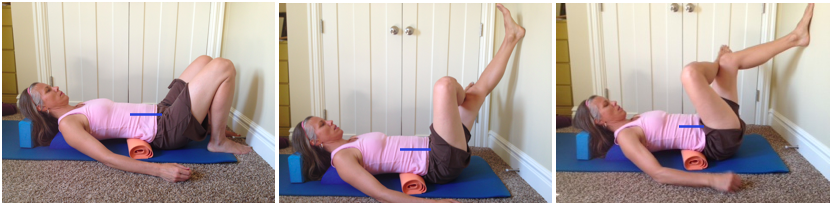
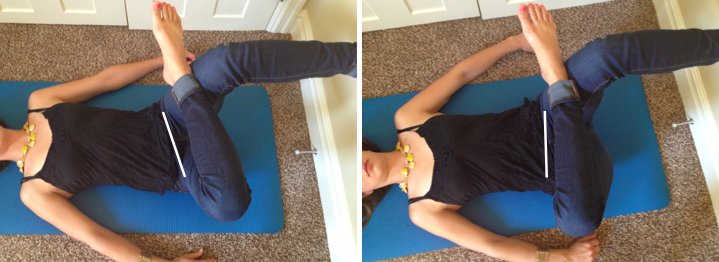
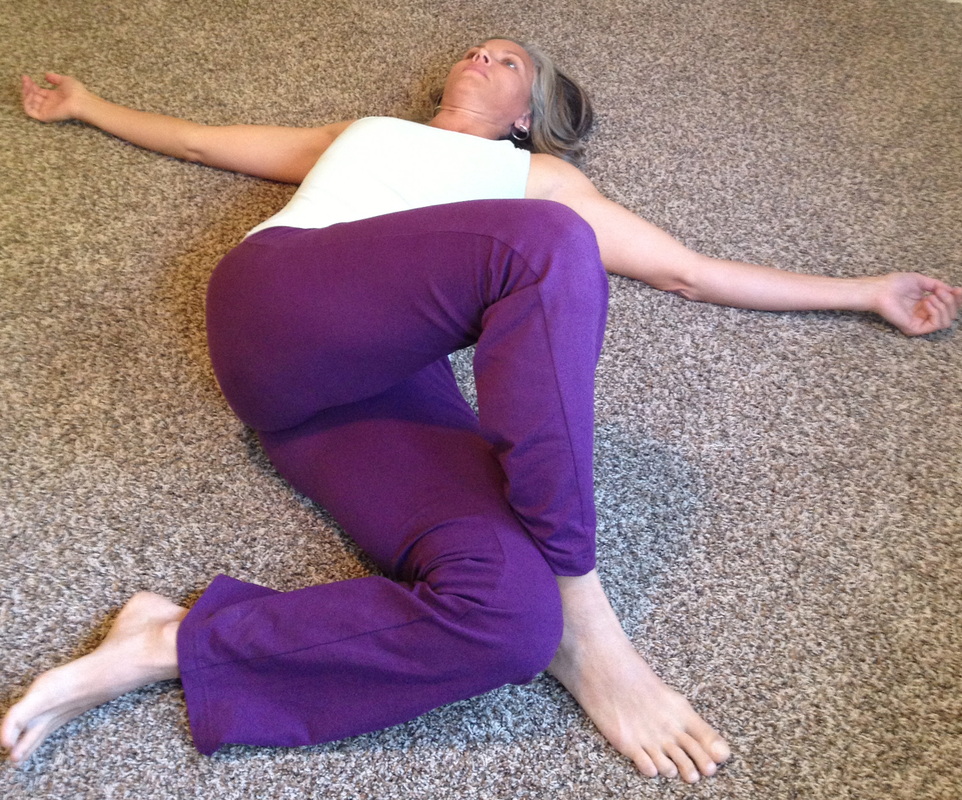
Standing in alignment and learning how to let go of the grip in the rotator muscles is essential for healing, as well as reprograming the normal glide of the head of the femur.  In normal motion, as the knee moves toward the chest, the head of the femur should glide back and down.  Due to the tightness of the rotators, the back (posterior) hip capsule can be restricted.  Restoring the tissues and the hip motion can be achieved through simple self mobilizations.
Standing alignment for back and hip health
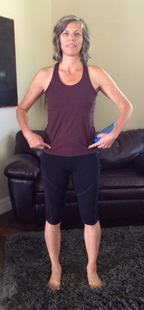
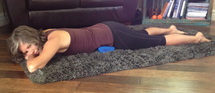
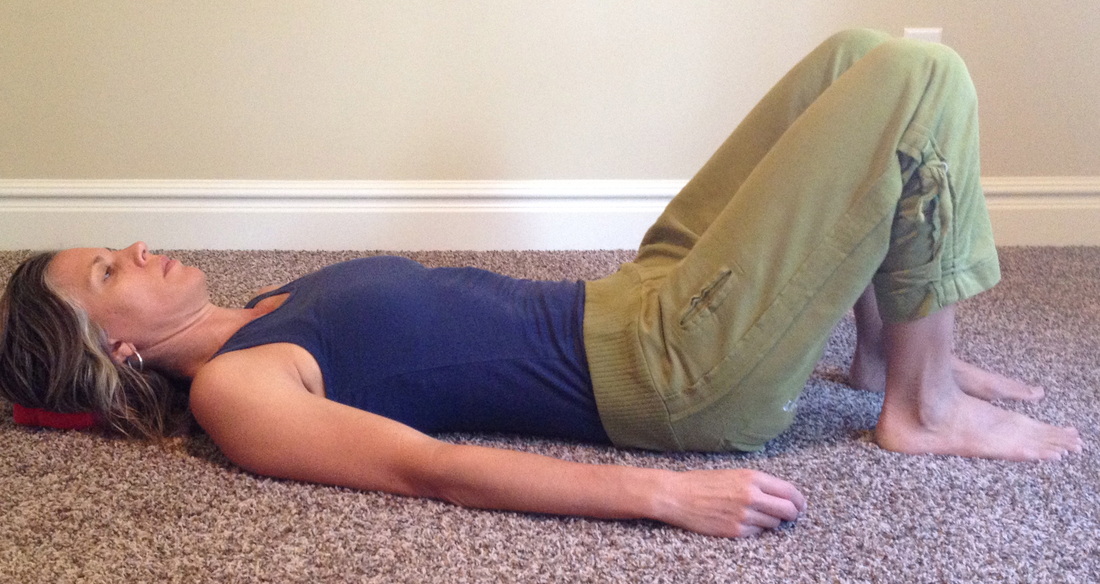
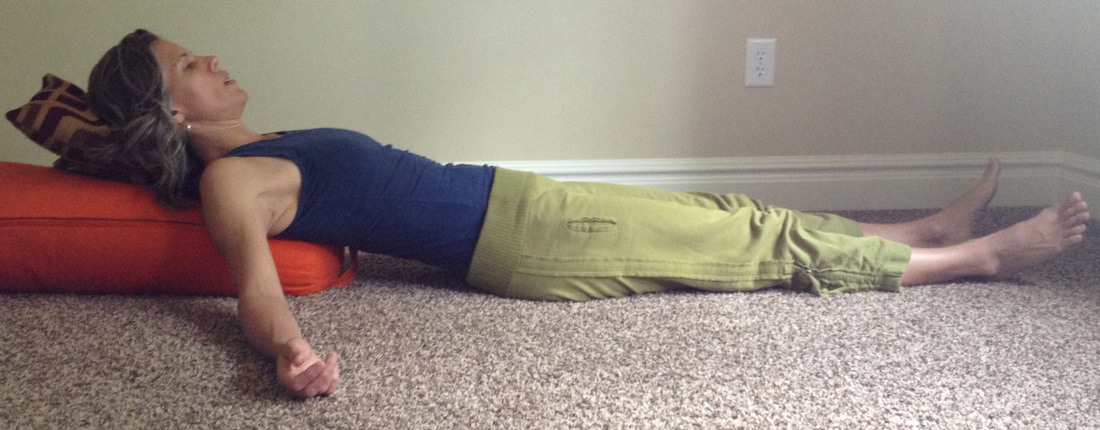
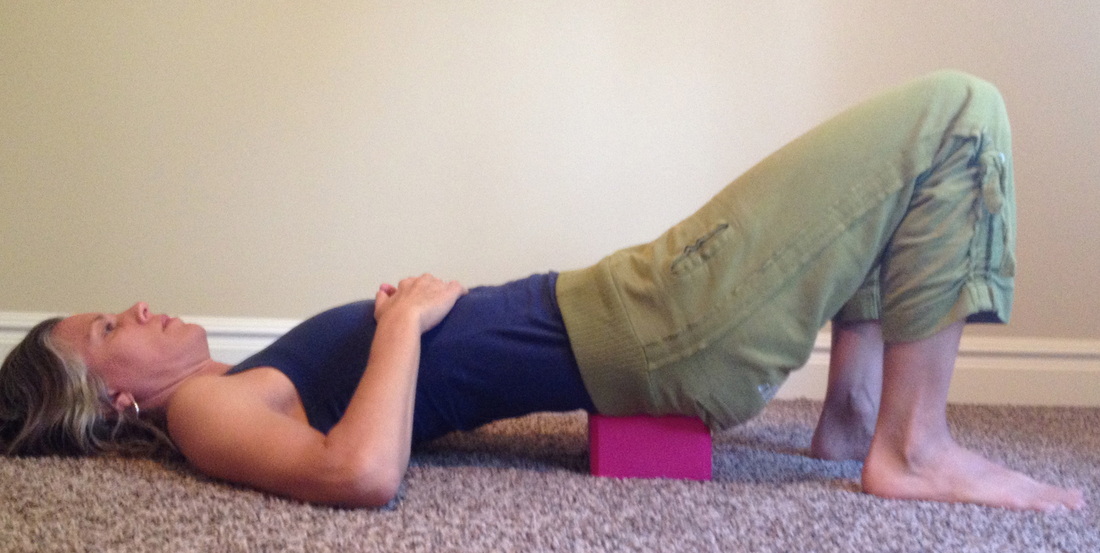
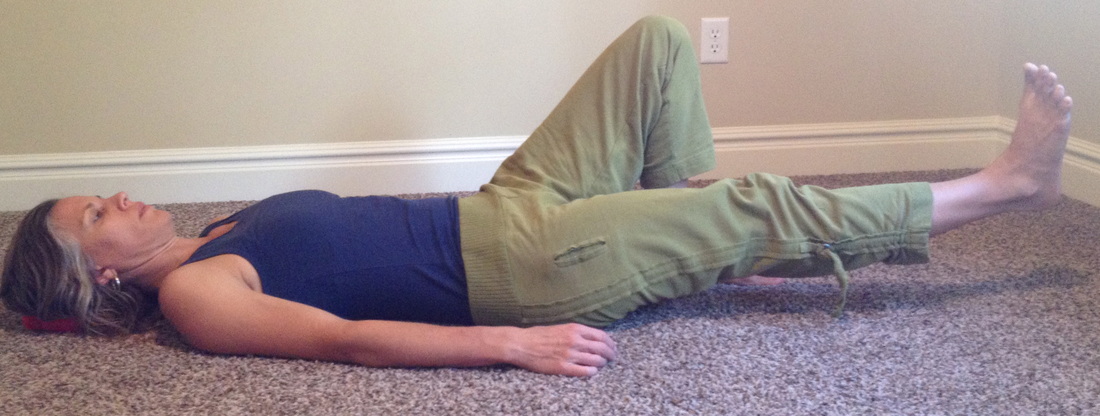
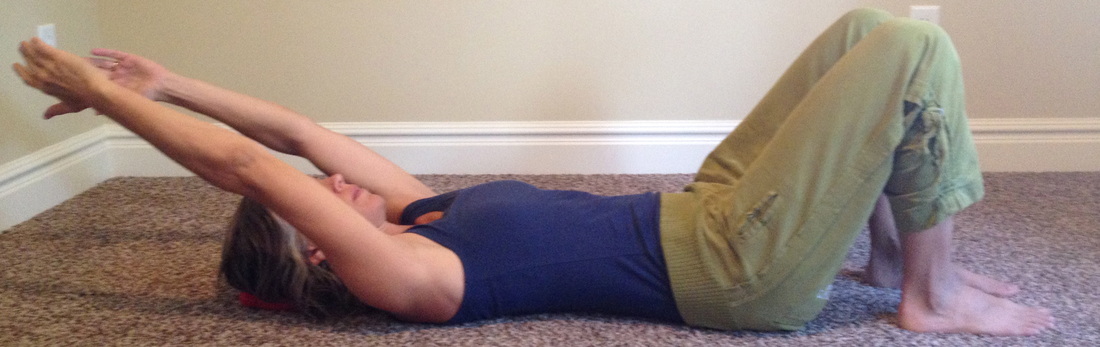
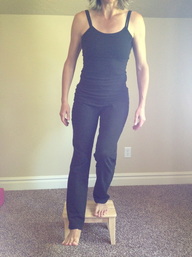
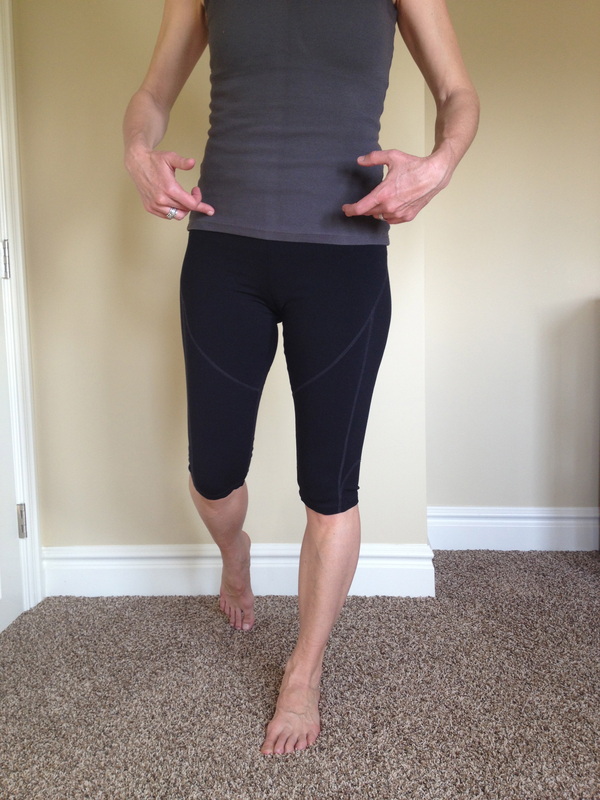
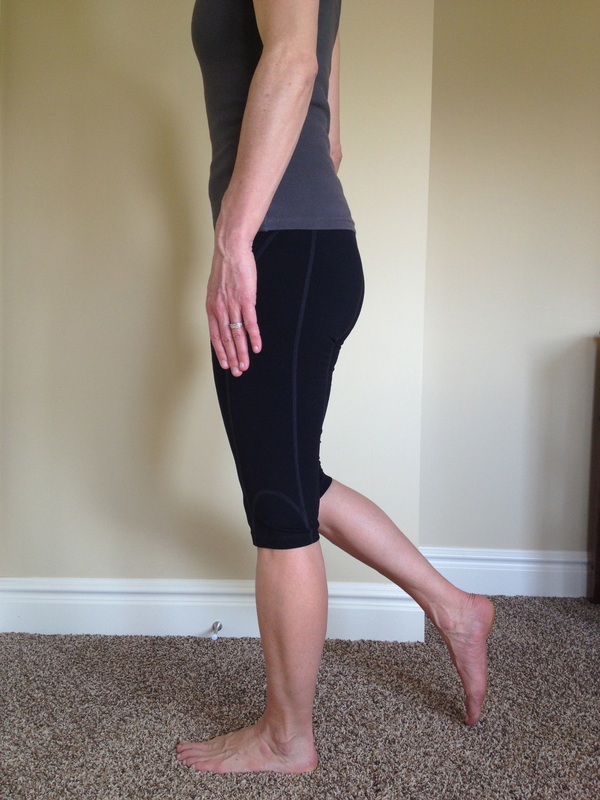
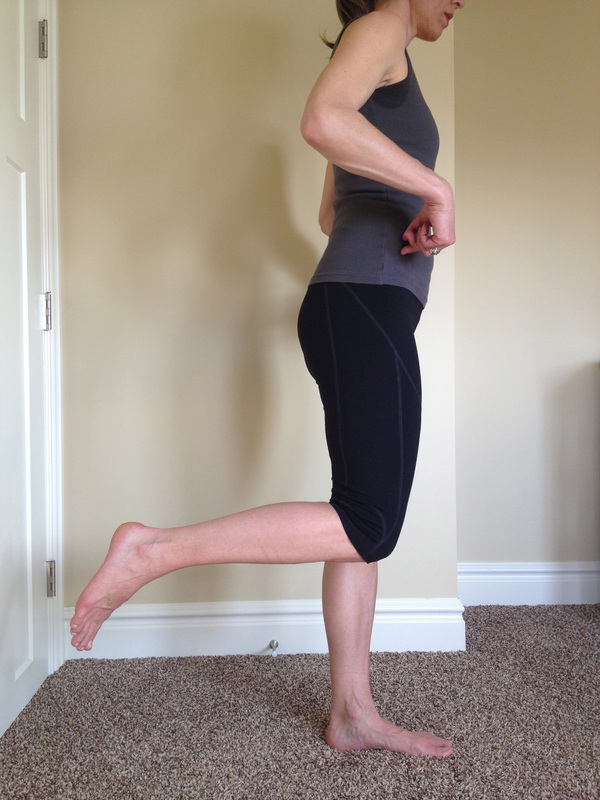
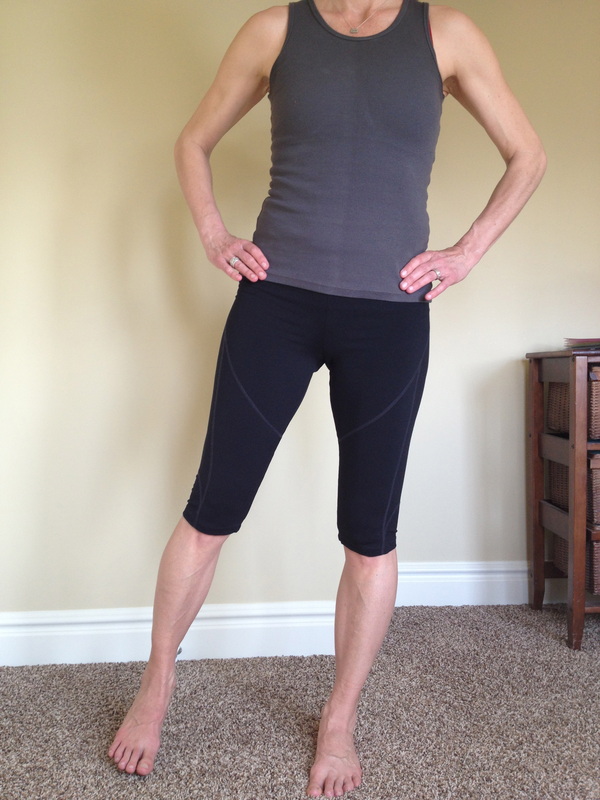
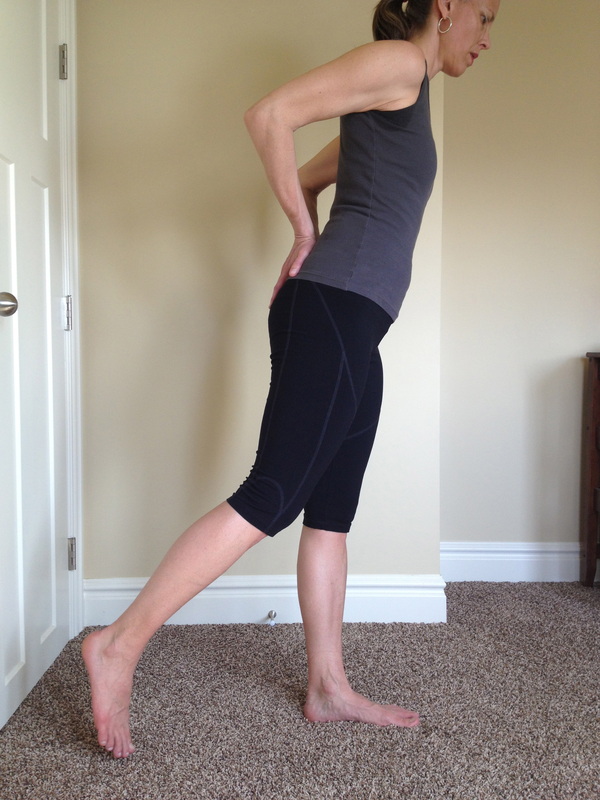
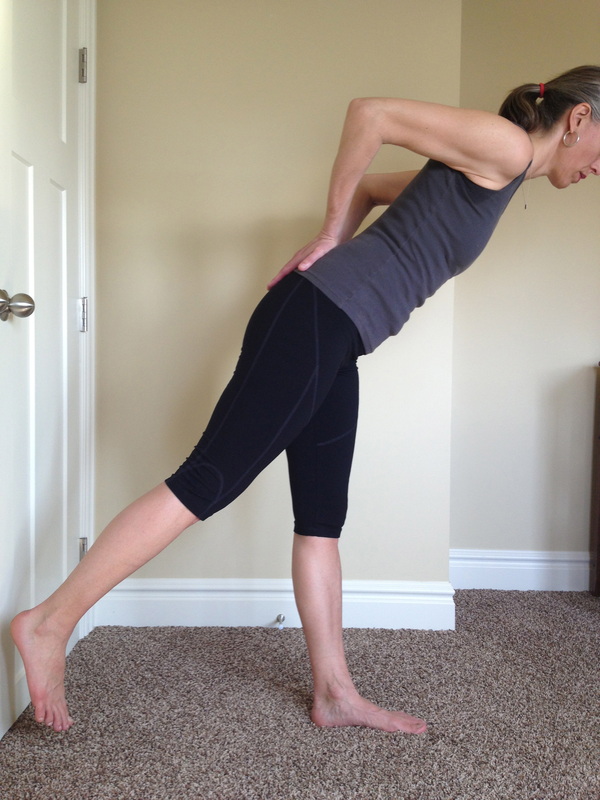
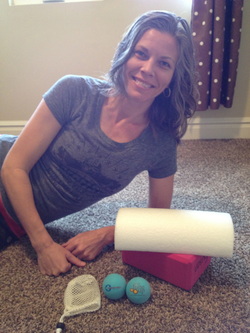
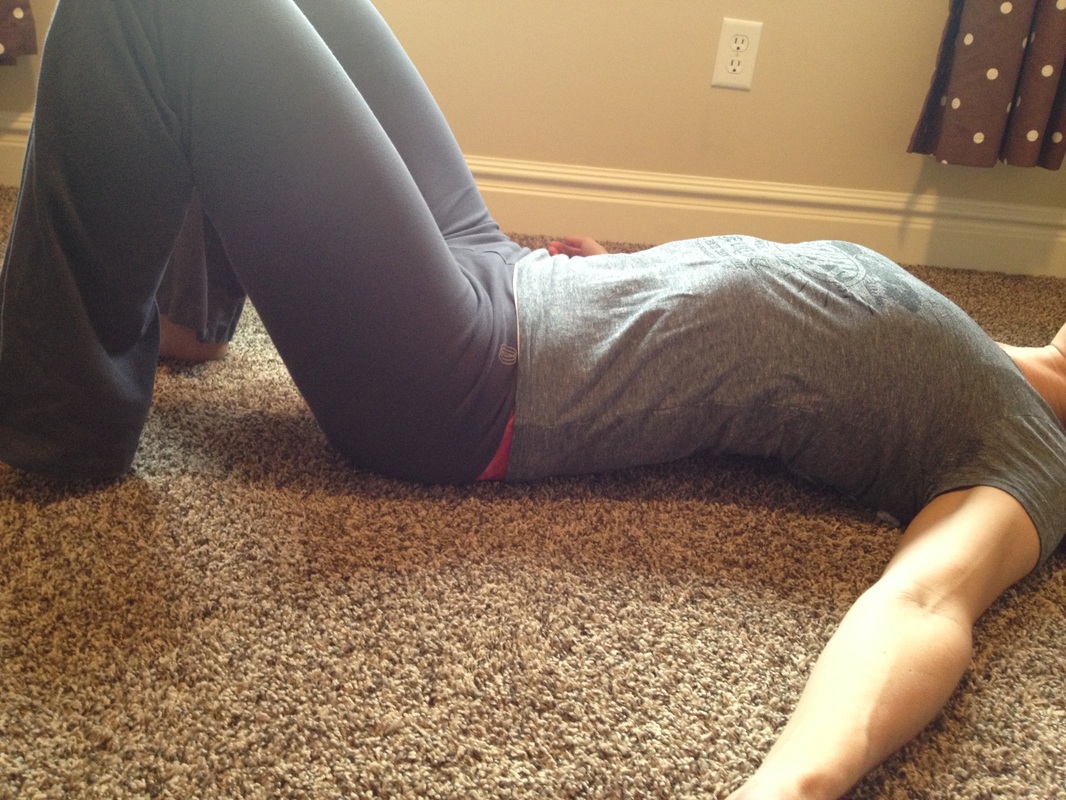
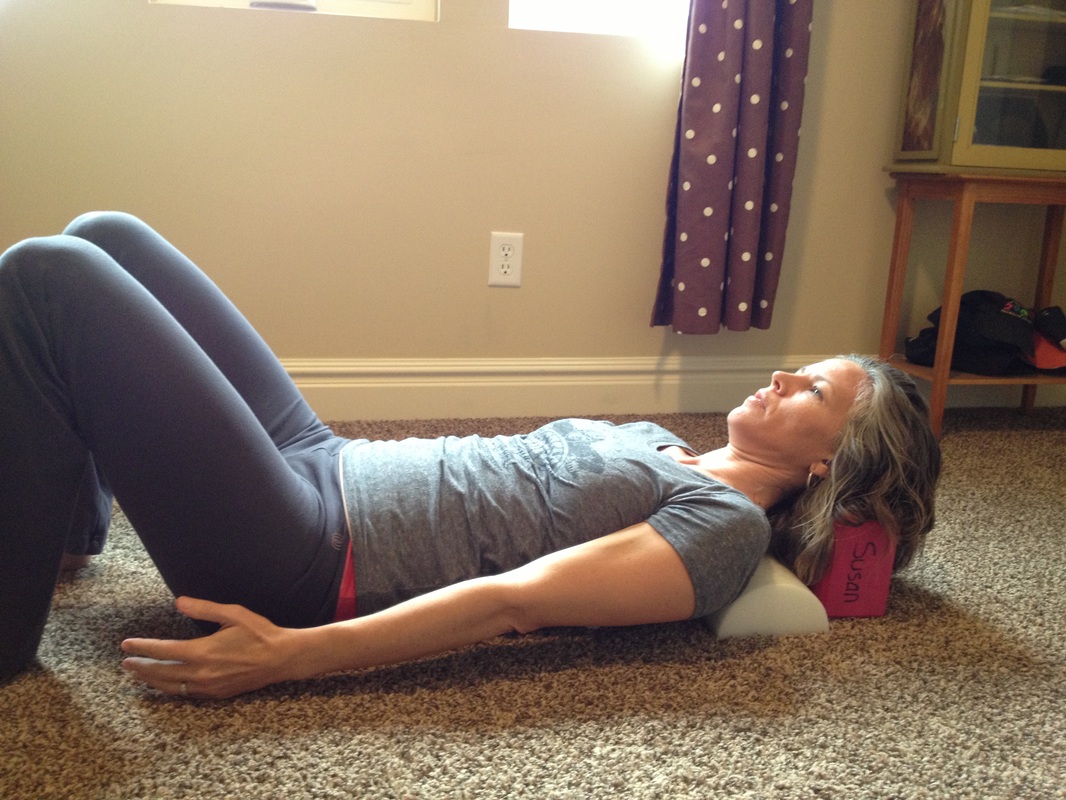
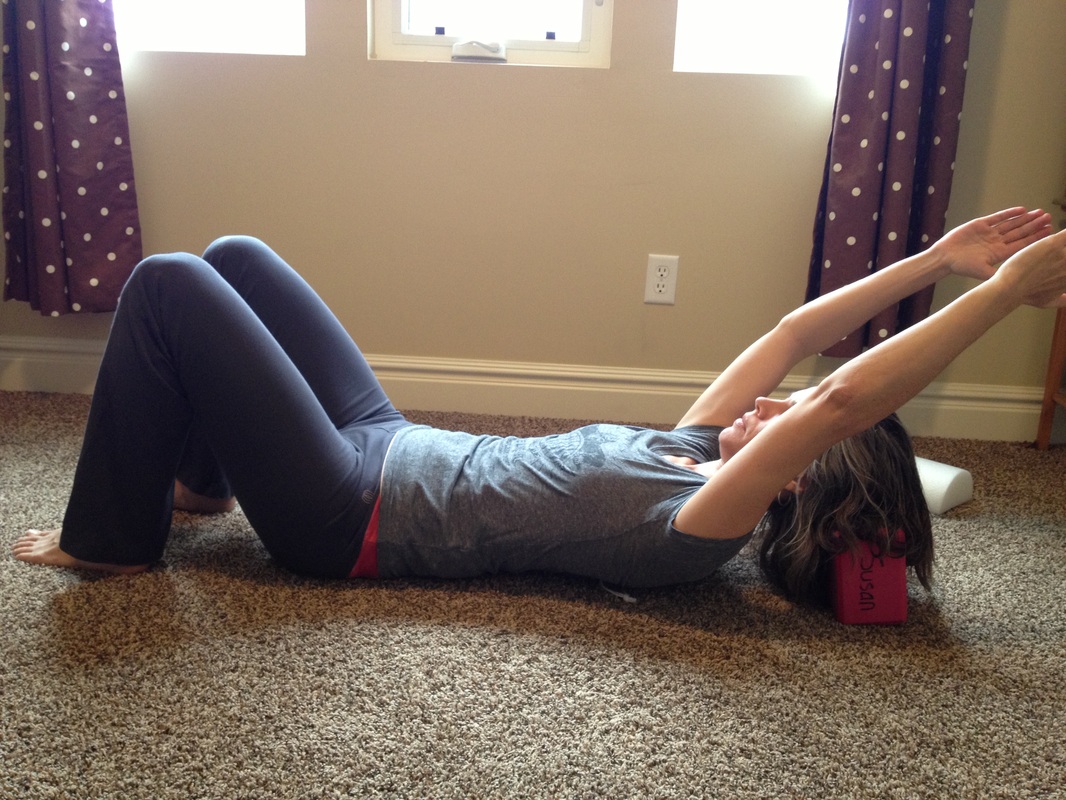
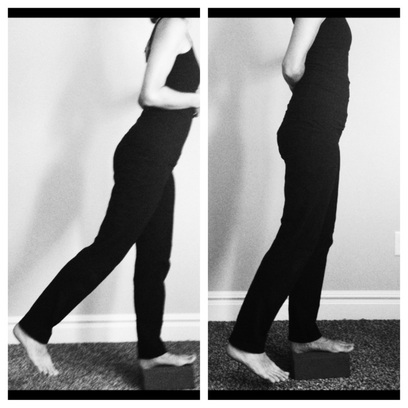
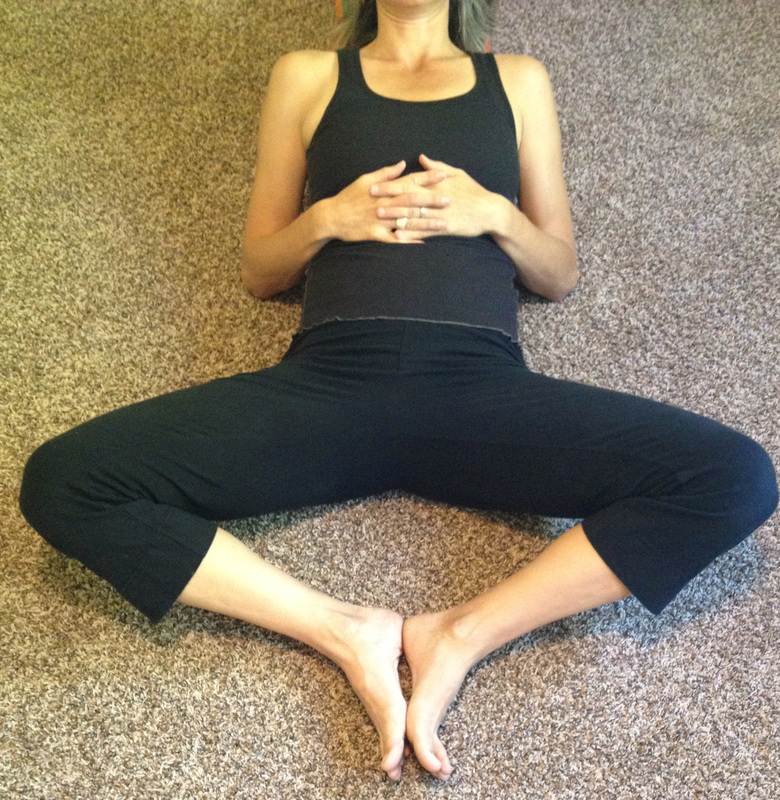
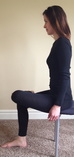
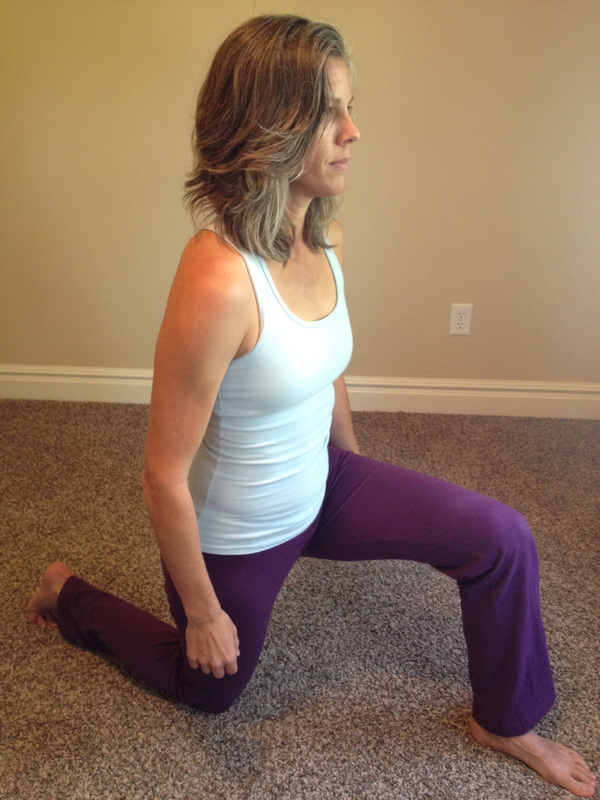
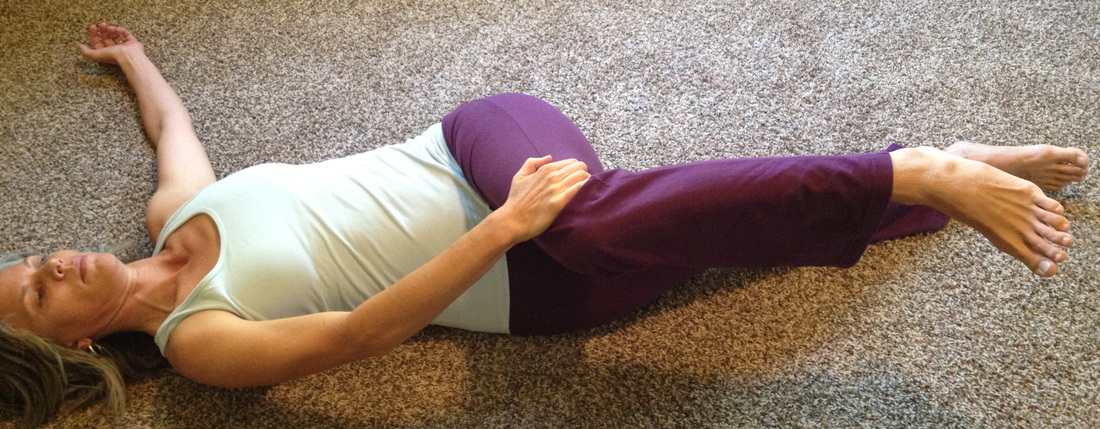
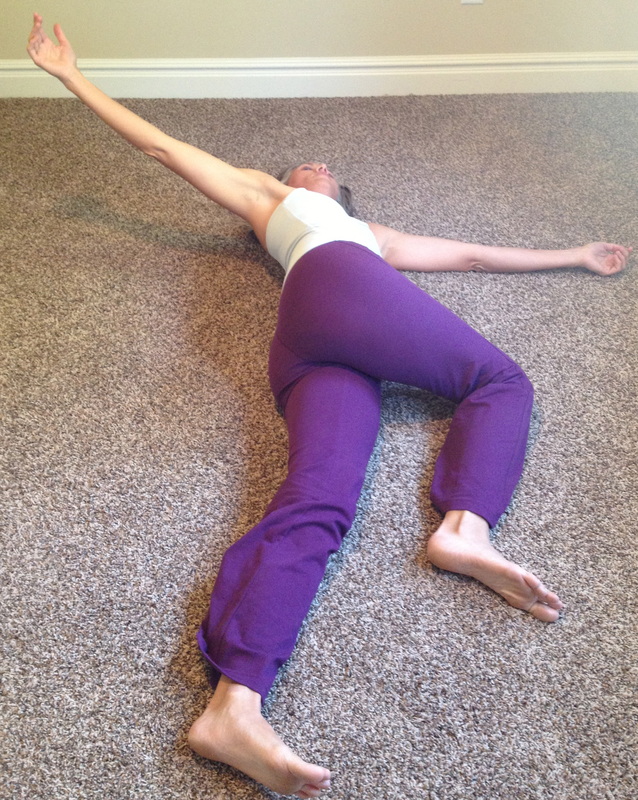
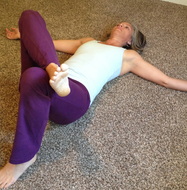
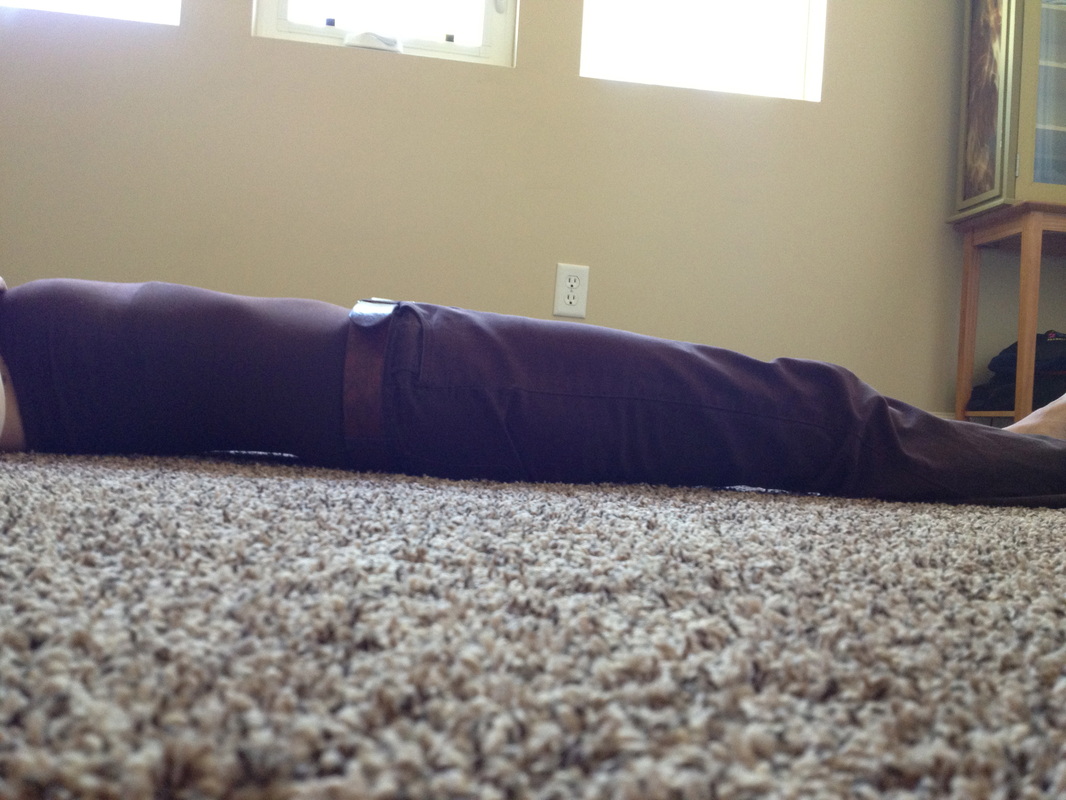
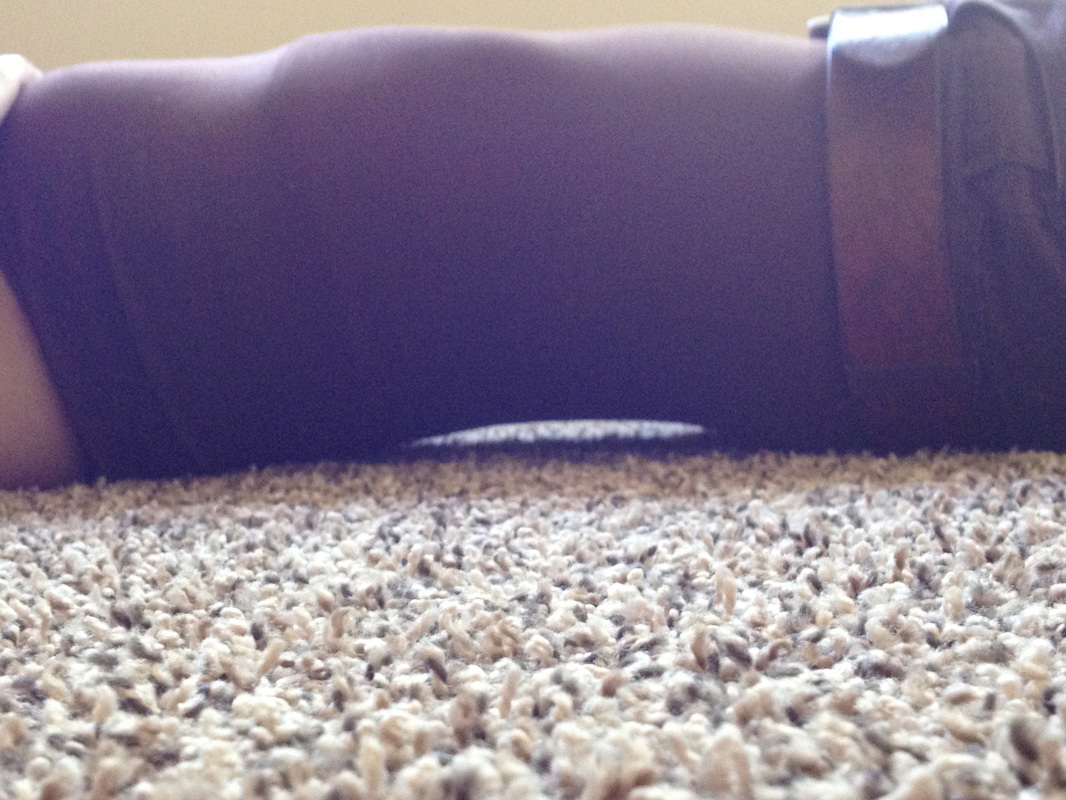
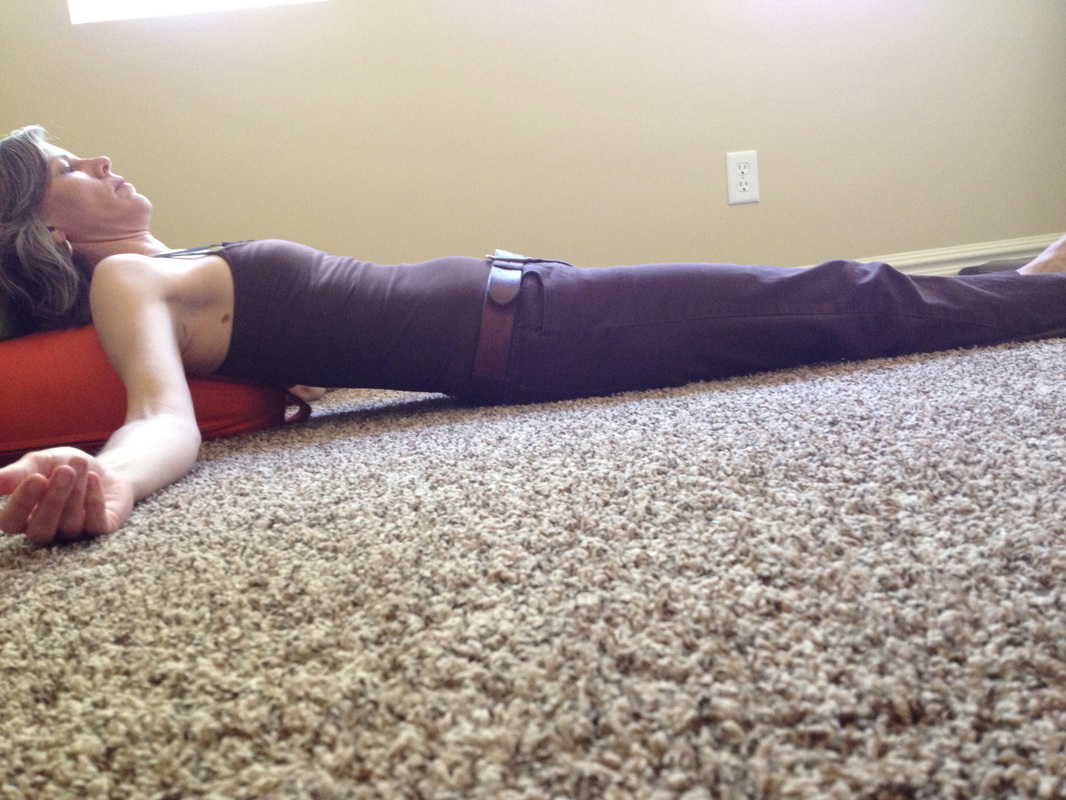
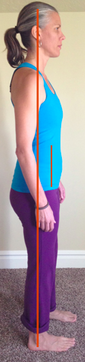
1. Standing Alignment: vertical leg, torso stacked over the legs.  Think about a plumbline going through the midpoints of the shoulder, hip, knee and front of the ankle bone.

2. Release Deep Hip Rotators:  Lie down on your back with your knees bent.  Place a tennis ball under your left butt cheek just to the side of your sacral bone.  Rock your knees to the side and return to start position 3 times.  Find a new spot and repeat.  Complete in 3-5 different areas and then switch sides.
Piriformis Release with tennis balls
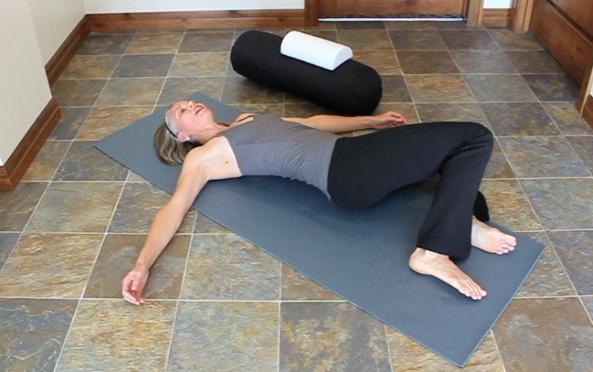
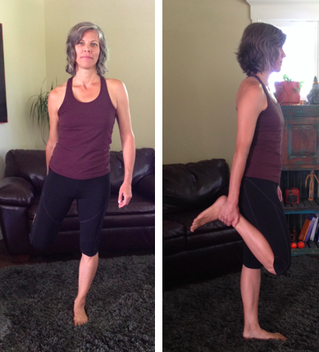
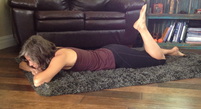
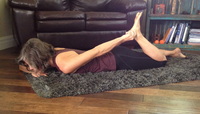
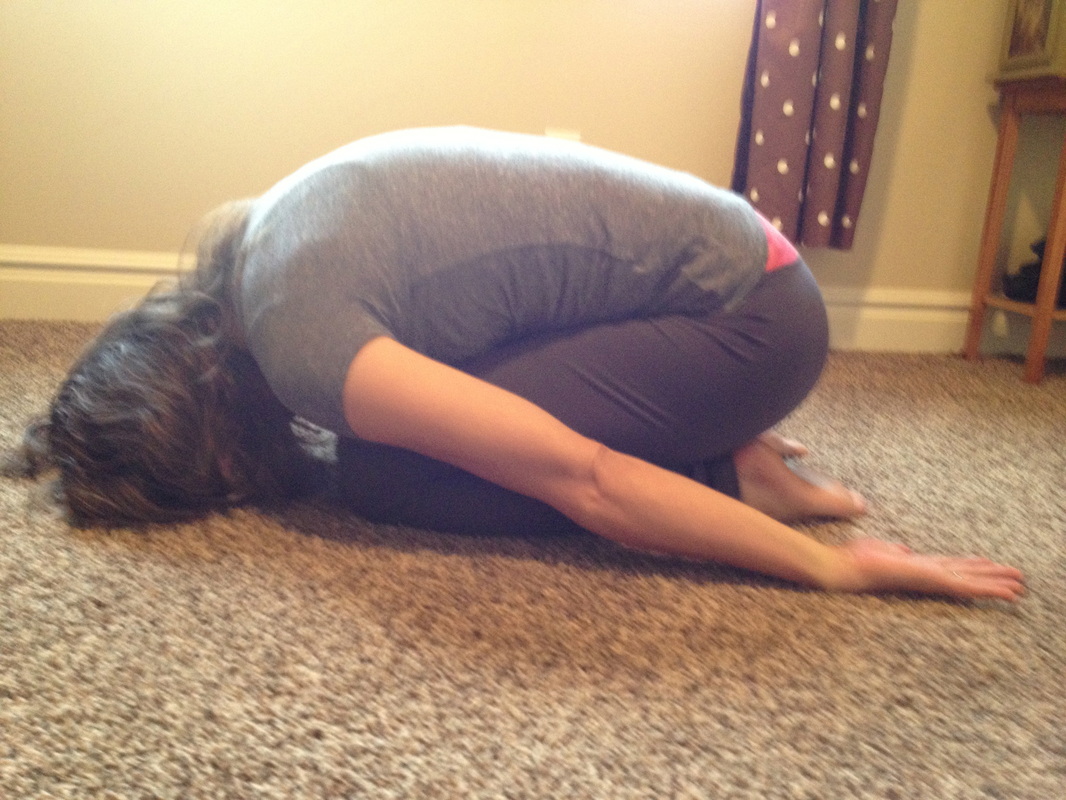
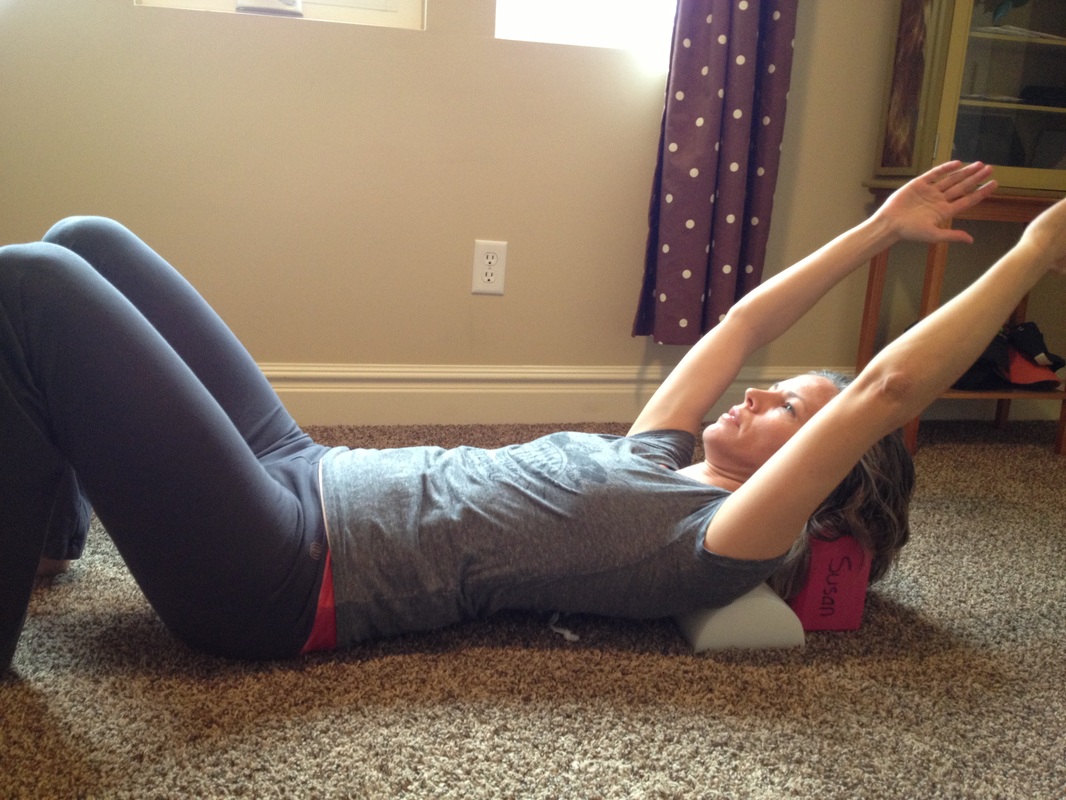
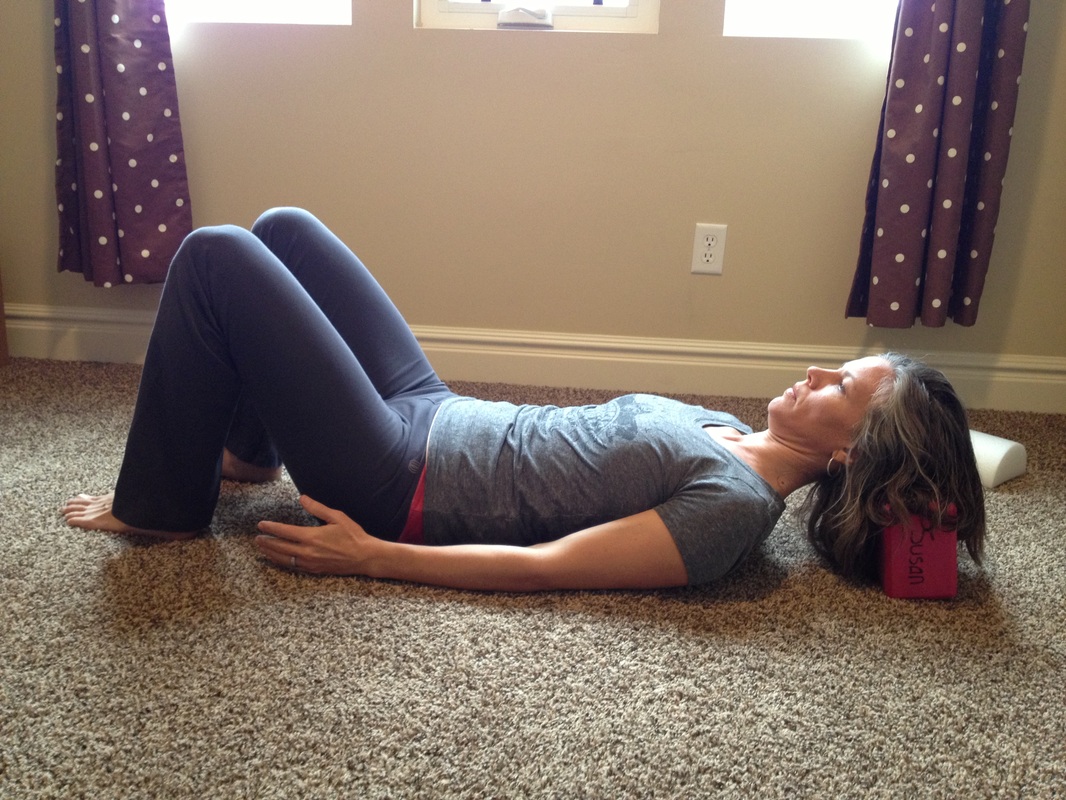
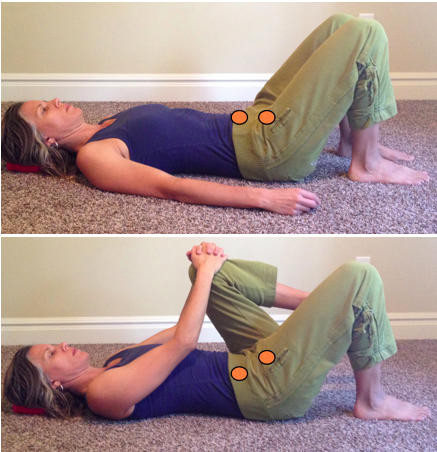
3.  Hip Release and Hip Glides:  this is a video demonstrating how to do the self mobilizations to regain normal motion.
Susan McLaughlin is a physical therapist who specializes in the management of pelvic floor and orthopedic dysfunctions. She is the owner of ALIGN integration|movement in Salt Lake City, UT.  Helpful tips and other self care strategies can be found at www.alignintegrationandmovement.com.
25 Comments

Refining the Quad Stretch

8/14/2014

15 Comments

 
Picture
The quadricep muscle group is comprised of 4 muscles that all share a similar attachment to the lower leg bone, the tibia. The muscles converge at the knee at the patella (knee cap) and inserts onto the tibial tuberosity.  The muscles are named for their location on the thigh:
  • Vastus Lateralis -spans from the outside of the thigh to the tibial tuberosity
  • Vastus Intermedius -spans from the center of the thigh to the tibial tuberosity
  • Vastus Medialis- spans from the inside of the thigh to the tibial tuberosity
  • Rectus Femoris- spans from the front crest (anterior inferior iliac spine) of the pelvis to the tibial tuberosity

The main action of this group is to extend (straighten) the knee and the rectus femoris will also flex the hip.  Quadricep control is important for walking, running, going up and down stairs, lunging, squatting, basically every move we make.  Having supple quadriceps is key not just for healthy knees, but for healthy feet, hips and spine.  Restrictions in the quads will affect proper loading of the foot and knee during gait.  Tightness in the rectus femoris can pull the pelvis forward into anterior rotation which increases lumbar extension and spinal compression, and can limit hip extension (being able to bring the leg behind you).


How to stretch the quadricep

Let's face it.  Many of us are super tight, and it feels good to pull on the leg as far as you can to get a deep stretch. The stretch always feels good, but the muscles never fully let go and we have to keep stretching forever and ever.  One possible reason why the muscles don't make lasting changes is that we have a stretch reflex within the muscles that serve as a protective mechanism:  if the muscle is stretched too far beyond its limit, it will contract to prevent injury.  During stretch sessions, you may be moving beyond your tissue limit so the muscles never change!  One way to refine and meet your tissues is to scale back and use alignment markers to guide you into your stretch.
Alignment Markers:
  • Maintain level shoulders and pelvis
  • Keep thigh in line with hip: don't let it move out to the side, or out to the front 

Typical quad stretch

Standing Quad Stretch
Notice in the first pic that in order for me to grab my shin I had to move the thigh out to the side, and you can see that as I hold my ankle my right shoulder has totally dropped down. In the pic on the right you can see that due to the tightness I have had to move my thigh in front of me, rather than behind me.

Refined quad stretch

Standing quad stretch refined
Here I am using a strap to help me meet my tissues. On the left you can see that my shoulders have leveled out and my thigh is straight down from my hip. You can see in the pic on the right that I can barely bend my knee as I keep my leg straight down rather than out in front of me.

How to release the rectus femoris (hip flexor and knee extender)

Picture
I am pointing to the ASIS landmarks on the pelvis.
Picture
The half cylinder (rolled yoga mat or towel) will cover the ASIS landmarks. The pubic bone will not touch your prop.
Quadricep release on the floor
Lie on your stomach with the bolster under your pelvis markers. Make sure that it does not touch your pubic bone. Breathe here and relax for 3-5 minutes.
Assessing new motion after quadricep release
After your release remove the bolster and see how far you can bend your knee. Make sure that you keep your pubic bone touching the floor.
quadricep stretch on the floor
See if you can reach for your foot, ankle or shin. Make sure you can keep your pubic bone down. Hold for a stretch. If you can't reach with your arm, grab the strap.
Susan McLaughlin is a physical therapist who specializes in the management of pelvic floor and orthopedic dysfunctions. She is the owner of ALIGN integration|movement in Salt Lake City, UT.  Helpful tips and other self care strategies can be found at www.alignintegrationandmovement.com.
15 Comments

How to Strengthen Your Gluteus Maximus

5/19/2014

13 Comments

 
How to strengthen your gluteus maximus
I have been working with a client for a few visits.  His main complaint: L low back pain and L hip pain.  He has made some good progress and will feel good for about a week or so and then the discomfort will come back.  In our last session we found that he couldn't lift his left thigh off of the table when he was on his stomach, and it really hurt his back.  I could see that his back muscles on his left side were really working hard.  I released the back muscles and his discomfort went away, but he still couldn't lift his leg.  His left gluteus maximus was not responding what so ever!
This last weekend I attended a training called  "Finding Center"  by Gary Ward of Anatomy in Motion.  The first day of training we spent 4 hours exploring the 3D movement of 6 key muscles in the body. One of these muscles was the gluteus maximus.  Many of us know the glute max actions: hip extension, hip external rotation and hip abduction.  Typical ways to strengthen this muscle is through concentric contractions as in clam shells, fire hydrants, bridges, lunges and squats.  
According to Gary Ward, the first rule of movement is: "Muscles lengthen before they contract."  His theory is that you want to lengthen the muscle as far as it can go, and it has nothing to do but contract.  I applied this concept when I returned from my training. 
My client came in this week with his left back and hip a little aggravated.  I tested my client again on his stomach.  He could not lift his thigh off of the table, and he had incredible pain in his back.  I had him stand up onto his left leg and move through the single leg squat and 3D reach.  I had him allow his hip and knee to move into flexion, adduction and internal rotation (prior to this training, I would have controlled for knee adduction and internal rotation).  After completing about 10 repetitions he says, "I don't have the pain in my glute anymore."  We moved through a few more patterns, got him back on the table and retested his ability to lift his thigh off the table:  Full lift without any pain!  He was completely amazed, and quite honestly so was I!  He got off of the table, took a walk and didn't have any pain.  Next time you feel like you are stuck in your training, or you have a case of "dead butt", remember: muscles lengthen before they contract.
I have included one of the movement patterns I went over with my client in the video below.  Rather than tapping down with the foot, you can also try reaching your arm out to touch the floor in a clockwise fashion.

3D Glute Max

Susan McLaughlin is a physical therapist who specializes in the management of pelvic floor and orthopedic dysfunctions. She is the owner of ALIGN integration|movement in Salt Lake City, UT.  Helpful tips and other self care strategies can be found at www.alignintegrationandmovement.com.
13 Comments

Relieve Upper Back Tension

3/4/2014

16 Comments

 
Below is a video sequence to address spinal mobility and upper back tension.  Before you begin, lie on your back with your legs out straight.  Notice the contact of the back of your legs, your low back, lower ribs and shoulder blades to the floor. After you complete the sequence, lie on the floor again and notice the change of your muscles and your connection with the floor.  Enjoy!
Susan McLaughlin is a physical therapist who specializes in the management of pelvic floor and orthopedic dysfunctions. She is the owner of ALIGN integration|movement in Salt Lake City, UT.  Helpful tips and other self care strategies can be found at www.alignintegrationandmovement.com.
16 Comments

Ten Exercises for a Healthy Psoas

10/5/2013

76 Comments

 
Picture
We have two psoas muscles on each side of our body: psoas major and psoas minor.  This blog is specific to our psoas major.  
This summer I took a very cool tele-class from Liz Koch, of Core Awareness.  In this 5 week series we explored the location and function of the psoas and its relationship to the nervous system and our "fight/flight/freeze" response,  to our emotional well-being and to our skeletal support.
The psoas is centrally located: emerging from the midline at thoracic level 12, attaching to every lumbar vertebra and inserting into the inner thigh at the lesser trochanter.  
The psoas allows the lower limb to move and swing a as a pendulum: multidirectional/orbital.  
As a physical therapist I see many people with SI dysfunction, hip and back pain.  In almost all cases, the psoas is the top priority to rehabilitate.   On muscle testing the psoas is usually weak, and the flexibility test is usually tight.  What I have come to understand through this tele-class, through my training as a Restorative Exercise Specialist™ and as an NKT™ practitioner, is that rather than manipulate the psoas through deep tissue work and stretching, the psoas needs to rehydrate and recover from over-exhaustion.
I have compiled my favorite top 10 ways to release, rehydrate and restore the psoas.  It is helpful to perform a release before going onto the movement sequences.  Some of these are from Liz Koch's book, "The Psoas Book" and some are from the Whole Body Alignment Program.

Releases

Constructive rest position for psoas release
Position yourself on your back as shown. You can use a pillow for your head if you notice that your chin lifts to the ceiling. Begin to focus on your breathing. Tune your awareness to your hip sockets. Imagine that the head of your femur bone is centered in the socket of your pelvis. Breathe here for 5 minutes.
Psoas release with a bolster
Postion yourself on a bolster or rolled up exercise mat as shown in the picture. You want to find a bolster that is high enough so that the back of your thighs touch the floor. When you lie on the bolster, you want to make sure that your lower ribs are flush with your abdomen. Breathe here for 2-5 minutes.
Hip flexor release with block under the pelvis
Position a yoga block, rolled up yoga mat or thick book under your sacrum. You want to make sure that the block does not go higher than your pelvis (it should not be blocking your low back). Breathe here for 2-5 minutes.

Movements

Modified Thomas Stretch
After the block release, bring one leg toward your shoulder as shown in the picture. Let the other leg go out straight and begin to lower the leg down to the floor. Make sure to keep the knee straight. Hold for 3-5 breath cycles and then repeat on other side.
Quadruped hip extension
Come on to your hands and knees (or onto your forearms as shown in the picture). Kick one leg back with a straight leg. Make sure to keep your pelvis level. Move your leg toward the floor keeping your leg straight and then extend your hip back as far as you can go without moving or rotating your pelvis. Repeat 10 times, then switch sides.
Supine straight leg raises
Lie on your back as shown. In this movement you will keep your leg straight as you lift your leg up and down 10 times, then place your leg on the floor and slide your foot toward midline and then outwards 10 times. Repeat on other side.
Picture
Bend your knees and reach your arms toward the ceiling.
Psoas stretch with arm movement
Begin to move your arms overhead as far as you can go without arching your back or lifting your ribcage, and then return to starting position. Repeat 10 times.
Knee to chest stretch with bent knee
With your knees bent, bring one knee toward your chest. Take 3-5 breath cycles and then switch sides. Repeat 3 times each side.
Single leg hip stretch with leg straight
With your opposite leg straight, bring one knee toward your chest. Take 3-5 breath cycles and then switch sides. Repeat 3 times each side.
Susan McLaughlin is a physical therapist who specializes in the management of pelvic floor and orthopedic dysfunctions. She is the owner of ALIGN integration|movement in Salt Lake City, UT.  Helpful tips and other self care strategies can be found at www.alignintegrationandmovement.com.
76 Comments

Get Rid of Sciatica

7/12/2013

18 Comments

 
Get rid of sciatica with this stretch
Tension in the piriformis muscle can trigger irritation of surrounding tissues.  The sciatic nerve exits the pelvis just below the piriformis.  When there is dysfunction in the lumbo/pelvic/hip complex, the piriformis often gets overworked, creating compression and friction on the sciatic nerve.  Sciatica is defined as aching/burning/stinging pain along the distribution of the sciatic nerve: buttock, back of the thigh, lower leg and foot.
Stretching the piriformis can be a very effective way of diminishing the compression, and therefore irritation of the nerve.  Pictured to the left is a very common stretch given as treatment to relieve sciatica.

Piriformis  Stretch Refined

Piriformis stretch at the wall
A traditional piriformis stretch, is often done with a tucked pelvis (and/or flexed spine) and can irritate the nerve if the leg is pulled  too aggressively.  Instead, using the wall and props can be an effective way of maintaining a neutral spine and pelvis. By staying in alignment, and by being able to adjust the load by gradually bending the knee to 90 degrees, the tissues will begin to yield and let go, rather than work to hold the body in position.  
Picture on the left: The half cylinder and block supports my shoulders and head to allow me to rest with a neutral spine, with my ribs down and a level pelvis.  Due to my current tension patterns, I also have to support my lumbar area with a rolled yoga mat so I can comfortably attain neutral pelvis (pubis and ASIS level).  
Middle picture:  I place my left leg straight on the wall and cross my right leg over the left, making sure not to tilt the pelvis. Picture on the right:  I begin to slide my heel down the wall and stop when I feel that I am at my resistance barrier, or my pelvis begins to shift.  Hold at least one minute and repeat on the other side.  If you can tolerate the stretch stay longer, up to 5 minutes on each side.
Piriformis stretch with level pelvis
Some people will try to get a deeper stretch by pressing the right knee down.  Make sure that you don't drag your whole pelvis when you do that (as shown in the pic on the left).  The purpose of this refinement is to maintain neutral, and that means a level pelvis (as shown on the right).   
Even if you don't have sciatica, this is a wonderful stretch to open the hips, and allow more freedom to your pelvis!  Enjoy!
Susan McLaughlin is a physical therapist who specializes in the management of pelvic floor and orthopedic dysfunctions. She is the owner of ALIGN integration|movement in Salt Lake City, UT.  Helpful tips and other self care strategies can be found at www.alignintegrationandmovement.com.
18 Comments

Gluteal progression for back, hip and knee health

3/20/2013

23 Comments

 
Picture
Photo by Gesina Kunkel 
Weak gluteal muscles can be blamed for many low back, hip and knee pain/injuries.  Without the muscular support, the back, hip and knee are subject to increased loads and excessive motion leading to friction and wear and tear. The 3 gluteal muscles: maximus, medius and minimus assist in controlling the trunk and the leg as it is loaded during foot contact to the ground as in walking, running, jumping, going up/down stairs, as well as moving from a sit to a stand or bending. 
When the gluteal muscles are weak, you will notice increased movement of the trunk toward the side of weakness, and the knee will cave in toward the midline.  Are your glutes weak or strong?

Gluteal assessment:  Step down from a stool. 

Start to observe what you do when you go up/down stairs: do you turn your foot out to give yourself more support, does your knee drift to the midline, do you shift your torso over to the planted leg to make it easier to step up? If yes, then your glutes are weak
What happens when you bend down to pick something off of the floor or transition to get in and out of a chair:  do your knees come together?  If yes, then your glutes are weak.  ​​
Gluteal strength assessment: step down from a stool
Stand on a stool. Slowly begin to lower one leg down, tap the floor with your heel and then return back up. Repeat 5 times. Notice if your standing knee collapses toward midline, or if your torso leans to the side. If either or both happens, you need to strengthen your glutes!

Strengthen your glutes: standing progression

Single leg standing balance
1. Start by standing on your left leg. Keep your thighs parallel and bend your other knee so your foot can tap down on the floor like a kick stand if you need it to balance. Check yourself in the mirror. Make sure that your pelvis does not rotate. Keep your ASIS facing forward (that is what I am pointing to). Ideally you want to have your pelvis level. Check your waistband: if the right side is elevated then you are using your back muscles to compensate, if it has dropped, then you are not activating your left glute! Work toward standing for 1 minute. Switch sides.
Single leg balance with vertical leg
From a side view, try to maintain vertical alignment: midpoint of shoulders and hips over ankle bone (I am not quite there, helps if you have a mirror to look into). Keep the standing leg straight, and your quads in front of the thigh relaxed!
Single leg balance with opposite knee flexion
2. Next progression begin to bend your knee as far as you can and then return to start position. Perform 10 reps and then on the last one, keep it bent as you balance for the final minute. Again, make sure that the pelvis doesn't rotate or drop.
Standing hip abduction to strengthen gluteus medius
3. Stand on your left leg. This time your pelvis will elevate because you won't be bending your right knee. Keep your leg straight as you move it out to the side and in. Work toward 1 minute and then switch sides.
Side step with monster band for gluteal strengthening
4. Side step with a light resistance band (if you have had a hip replacement do this without the band). Make sure to keep feet straight ahead and plant your foot with the outside edge straight.
Hip strengthening with resistant band
Make sure not to bend your knees. Most people cheat by bending the knee because the glutes are weak. Don't do it!
Monster walk with band glut med strength
Make sure to land your foot with the outside edge straight, this position engages your glut med and min. Return to normal hip width distance. Make sure to relax your quads between steps!
Standing balance with hip extension
5. Now for the glute max finale! Standing on your left leg, extend your rlght leg behind you. Begin to lower your torso as you hinge at your hips bringing your hips behind your ankle, and then return.
Hip strengthening: standing arabesque
Make sure the movement is coming from your hips, not your spine! Pelvis should stay level. This is challenging, mostly from a balance perspective. If this is hard for you, then get into position and hold.
Susan McLaughlin is a physical therapist who specializes in the management of pelvic floor and orthopedic dysfunctions. She is the owner of ALIGN integration|movement in Salt Lake City, UT.  Helpful tips and other self care strategies can be found at www.alignintegrationandmovement.com.
23 Comments

Thoracic Mobility

12/10/2012

12 Comments


Thoracic rotation assessment

Mobilize the ribcage to decrease neck pain
In my practice, I see many people with back and neck pain.  When I assess the spine, I often find that the thoracic spine and ribs are frozen stiff.  When the thoracic spine is not mobile, the low back and neck may compensate for this lack of motion, which can lead to overuse, tension and dysfunction.
Last weekend I purchased a lecture on the Thoracic Spine by Sue Falsone, PT, ATC from the website Movement Lectures. I was impressed with the material, and was inspired to include some of the exercises that she recommended to regain thoracic mobility into my Restorative Exercise™ class last week.  
I have also been loving my new Yoga Tune Up® self massage therapy balls, so I added some myofascial release into the class as well.
Below I share with you 3 movements to free your thoracic spine.

Breathing Exercise:  Enhance Rib mobility, improve rotation

Child's Pose breathing into the posterior ribcage
Get into child's pose with arms down by sides. This position will limit your ability to breathe into your belly and will encourage you to expand your breath into the back ribs. Take 5 good long breaths. Try to expand the ribs on the inhale, and on the exhale, close the ribs.

Reassess thoracic rotation:  More motion


thoracic extension and myofascial release with ball

Using Yoga Tune Up balls to release tension between the shoulder blades
Place two tennis balls in a sock. A sock will keep the balls from rolling all over the place. Lie down on your back with the balls underneath you just below your shoulder blades. Your spinous processes should be between the two balls.
Assess the spine: how much arch in your back?
Notice how much the ribs lift up when you lay down over the balls. You will need to prop up your upper back and neck to make sure you stay in alignment.
Thoracic Mobility: Flexion and Extension over tennis balls
The balls are placed at the bottom of the shoulder blades and the upper back is propped up so the ribs relax down against the body wall.
Self Mobilization for the thoracic spine
Lift the arms overhead. Make sure to only lift as far as you can before the ribs start lifting up. Complete 3-5 times and then move the ball up your spine.
 thoracic spine release
As you move higher up your spine, you will not need a prop under your shoulders.
Mobilization of the thoracic spine
Flexion and extension of both of the shoulders creates a flexion/extension moment at the thoracic spine. The ball helps to decrease the tension on the paraspinals.

I would love to know how great you feel after practicing this for one week!
Susan McLaughlin is a physical therapist who specializes in the management of pelvic floor and orthopedic dysfunctions. She is the owner of ALIGN integration|movement in Salt Lake City, UT.  Helpful tips and other self care strategies can be found at www.alignintegrationandmovement.com.
12 Comments
<<Previous
Forward>>

    Author

    Susan McLaughlin,
    Physical Therapist

    Picture
    Picture
    Picture
    Picture
    Picture
    Picture

    FEEL GOOD SERIES:
    Movement videos for download

    Picture

    Products I love:

    Picture
    Picture
    Picture

    Props for home:

    Disclosure: I only recommend programs and products that I would use myself.  If you use these links to purchase something, I may earn a small commission at no additional cost to you.  Thank you.  

    Categories

    All
    Alignment
    Back Pain
    Breathing
    Chronic Pain
    Core Stabilization
    Fascial Health
    Foot Health
    Healing The Nervous System
    Hip Pain
    Knee Pain
    Lower Extremity
    Neck And Upper Extremity
    Pelvic Health
    Postpartum Healing
    Pregnancy
    Psoas Release
    Self Care
    Shoulder Girdle
    Shoulder Pain
    Si Joint Pain
    Spine
    Thoracic Mobility
    Transversus Abdominis
    Treatment For Si Dysfunction
    Walking
    Wrist

    RSS Feed

    Archives

    March 2026
    February 2026
    May 2025
    November 2022
    May 2022
    November 2021
    April 2021
    December 2020
    September 2020
    July 2020
    June 2020
    May 2020
    April 2020
    February 2020
    October 2019
    September 2019
    August 2019
    July 2019
    March 2019
    January 2019
    December 2018
    November 2018
    September 2018
    August 2018
    June 2018
    March 2018
    February 2018
    January 2018
    December 2017
    November 2017
    October 2017
    August 2017
    July 2017
    May 2017
    March 2017
    February 2017
    January 2017
    December 2016
    November 2016
    September 2016
    August 2016
    July 2016
    June 2016
    May 2016
    April 2016
    February 2016
    January 2016
    December 2015
    November 2015
    October 2015
    September 2015
    August 2015
    July 2015
    June 2015
    May 2015
    February 2015
    January 2015
    December 2014
    November 2014
    October 2014
    August 2014
    June 2014
    May 2014
    March 2014
    February 2014
    January 2014
    December 2013
    November 2013
    October 2013
    August 2013
    July 2013
    June 2013
    May 2013
    March 2013
    January 2013
    December 2012
    November 2012
    October 2012
    September 2012
    August 2012
    July 2012
    June 2012
    May 2012
    April 2012
    March 2012
    February 2012
    January 2012

Office:  1817 S Main Street, Suite 10 | SLC, UT 84115
Located in the Forrester Office Complex
Client Portal Sign In


ALIGN integration | movement, PLLC.  All rights reserved.
@2012-2025
​Medical Disclaimer        Privacy Policy & Terms of Use
Good Faith Estimate
​

Contact:  Susan McLaughlin, PT 801.859.4142
[email protected]